When a carton sealer starts tearing tape, the problem rarely appears without warning. You may notice ragged edges, loose carton flaps, or a sharp strip of adhesive hanging from the machine. The question is simple: why is the carton sealer tearing the tape? In many cases, the cause involves blade condition, tape tension, roller pressure, or an incorrectly fitted tape roll. Dust and adhesive residue can also change how the tape travels through the sealing head.
A practical inspection begins with the details operators often overlook. Check whether the cutting blade feels dull or carries hardened glue. Examine the tape path for misalignment, then watch the roll during one complete carton cycle. Does it unwind smoothly? Does the tape pull sideways? These small observations often reveal more than changing parts immediately. The machine may not be defective.
Machine experience also shows that carton size and sealing speed matter. A narrow carton can pull the tape at an awkward angle, while excessive tension may stretch and split it before cutting. Manufacturer guidance remains the most reliable reference, especially for blade adjustment and pressure settings. Still, real working conditions can differ from the manual. Humidity, recycled corrugated board, and inconsistent tape quality may expose weaknesses that appear only during production.
A careful diagnosis prevents wasted tape and unnecessary downtime. It also protects operators from reaching into a moving sealing head. Some explanations are easy to miss. This guide examines the likely causes, practical checks, and sensible adjustments behind torn tape, while acknowledging that one symptom can have several sources.
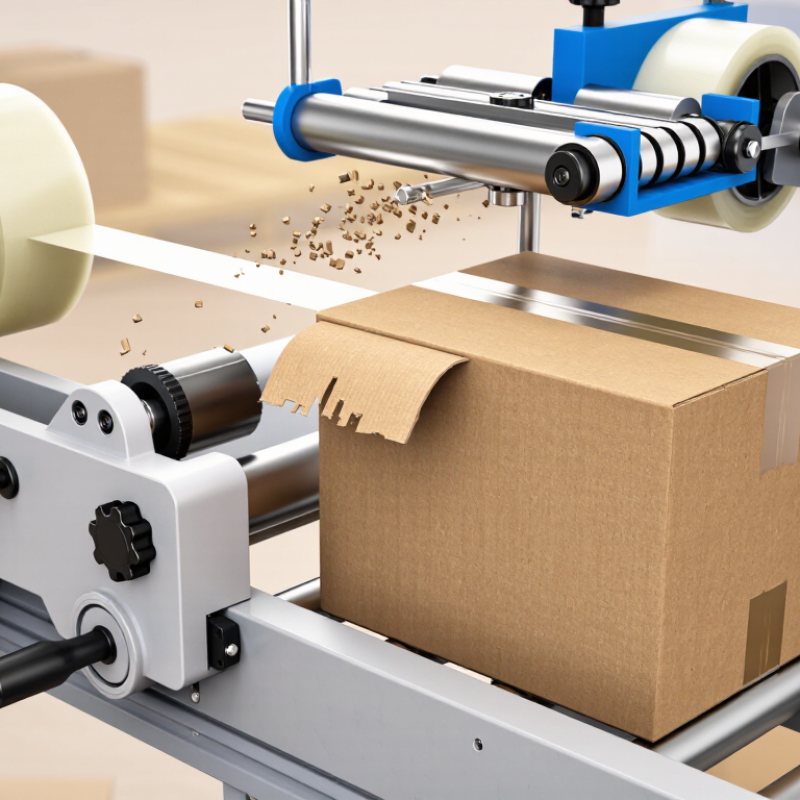
Tape tearing in a carton sealer usually starts with tension, alignment, or cutting problems. When the tape roll is mounted too tightly, it cannot unwind smoothly. Excessive tension then stretches the adhesive layer until it splits. A loose roll creates a different problem. It may wobble and feed unevenly.
Check the tape path while the machine is stopped. Dust, dried adhesive, or a bent guide can pull the tape sideways. The cutting blade may also be dull, chipped, or incorrectly positioned. A damaged blade often leaves a jagged edge instead of a clean cut. Inspect the pressure rollers too. If they press unevenly, the tape can wrinkle before reaching the carton. Small carton height changes can make this worse.
Temperature matters more than many operators expect. Cold tape may become stiff and tear near the blade. Excessive heat can soften the adhesive and leave residue on guides. Tape width, thickness, and adhesive type must also match the sealer’s settings. I once blamed the blade, but the real issue was a misaligned roll holder. That mistake cost several cartons and useful production time. Do not adjust every setting at once. Change one item, run a few cartons, and record the result. A short test often reveals whether the tear begins during unwinding, application, or cutting. Inspect the first damaged carton closely. Its torn edge usually shows where the fault starts.
Why Is My Carton Sealer Tearing the Tape?
How to Inspect the Tape Path and Cutting Components
When a carton sealer tears tape, inspect the tape path before replacing parts. Disconnect power, then remove loose tape from the rollers, guides, and cutter area. Look for adhesive buildup, folded edges, or a guide that sits slightly out of alignment. Even a small obstruction can pull the tape sideways and create jagged tears.
Check whether the tape unwinds smoothly from the roll. The roll should turn without sudden resistance. Examine the tension arm and spring for uneven movement. Then inspect the cutting blade for chips, rounded edges, or sticky residue. A blade may look sharp but still cut poorly. Also check the blade position against the tape centerline. It should contact the tape cleanly, not drag across it. The obvious cause is not always the real one.
Tips: Use a clean, lint-free cloth and an approved maintenance solution. Do not scrape adhesive with a sharp metal tool. Mark the guide position before adjustment, then change one setting at a time. Run a few test cartons and inspect the tape tail closely. A short, clean cut usually indicates proper alignment. If tearing continues, measure tape tension and check for worn bearings. Sometimes, the inspection is still incomplete. Record the adjustment that helped.
Relative diagnostic priority for common tape-tearing causes during inspection of the tape path and cutting components.
Start with tape alignment and roller condition, then inspect adhesive buildup, blade sharpness, and tape tension. A tape path that is not centered or has excessive resistance can pull the tape sideways and cause uneven cuts or tearing.
Why Is My Carton Sealer Tearing the Tape?
When a carton sealer tears tape, tape tension is often the first place to inspect. I once blamed the cutting blade too quickly. The real problem was excessive tension pulling the tape away from the carton surface. Set the tension low enough for smooth unwinding. The tape should contact the box without stretching or wrinkling. Watch the roll during operation. If its edges collapse inward, the tension may be too high. If the tape hangs loosely, increase it gradually.
Alignment matters just as much. The tape roll should sit squarely on its holder. The tape path must remain centered through the guides and sealing rollers. Even a small sideways shift can create a diagonal pull. That pull may tear the tape near the carton corner. Check whether the rollers are clean and parallel. Dust, crushed cardboard, or dried adhesive can change the tape’s direction. Use a straight carton for testing.
Adhesive quality also deserves careful attention. Store tape in a dry, moderate environment, away from direct heat and sunlight. Cold tape may stick poorly, while aged tape can split during application. Press a short piece onto clean cardboard and remove it slowly. It should bond evenly, not lift in patches. A quick visual check can mislead. Test several rolls from the same shipment when failures repeat. Record the carton surface, temperature, tape tension, and tear location. That small log often reveals patterns that memory misses.
| Inspection Dimension | What to Check | Reference Condition | Example Finding | Likely Effect on Tape | Recommended Corrective Action | Priority |
|---|---|---|---|---|---|---|
| Tape tension | Observe tape payout while the carton moves through the machine. | Tape should unwind smoothly without jerking, stretching, or sudden braking. | Roll stops briefly and then releases during carton entry. | The tape may split across its width or tear at the leading edge. | Reduce excessive brake resistance, inspect the tension arm, and verify that the arm moves freely through its full travel. | High |
| Tape tension | Inspect the tension arm position and spring condition. | The arm should remain stable during sealing and should not bottom out or oscillate continuously. | Arm vibrates when the tape roll diameter decreases. | Intermittent tension can produce wrinkles, edge splitting, and uneven adhesion. | Check spring fatigue, pivot contamination, and incorrect arm adjustment. Replace damaged mechanical parts. | Medium |
| Tape alignment | Check whether the tape roll is centered on the unwind shaft. | The roll should sit squarely on the shaft with no visible lateral wobble. | Roll shifts approximately 3 mm toward the operator side during operation. | The tape edge contacts a guide or frame and tears lengthwise. | Center the roll, tighten the retaining components, and inspect shaft wear or bent hardware. | High |
| Tape alignment | Trace the tape path from the roll through the guides, tension arm, and application rollers. | The tape should remain centered and should not rub against guide edges. | Tape contacts the left guide flange before reaching the wipe-down roller. | Abrasion or a cut at the tape edge can start a full-width tear. | Realign guide rollers, remove adhesive buildup, and confirm that all rollers are parallel to the carton travel direction. | High |
| Roller condition | Examine the application and wipe-down rollers for contamination or damage. | Rollers should rotate freely, remain cylindrical, and have clean contact surfaces. | Adhesive residue forms a hard ridge on one side of the roller. | A contaminated roller can pull the tape sideways or create localized stress. | Clean the roller with a suitable maintenance solvent, remove burrs, and replace rollers with damaged surfaces. | Medium |
| Adhesive quality | Inspect the adhesive coating for missing areas, streaks, exposed backing, or uneven color. | Adhesive should cover the intended surface uniformly without dry bands or foreign particles. | Longitudinal dry streak approximately 8 mm wide is visible on the roll. | The tape can detach from the carton and may tear when the sealer applies pressure. | Quarantine the roll, compare another roll from the same shipment, and report coating defects to the tape supplier. | High |
| Adhesive quality | Check tape age, storage conditions, and exposure to heat or moisture. | Store tape in its original packaging in a clean, dry area away from direct sunlight and excessive heat. | Roll was stored near a heat source and feels unusually soft. | Overheated adhesive may transfer to rollers, stretch, or lose consistent tack. | Move tape to a controlled storage area, allow it to condition before use, and replace rolls with visible deformation or contamination. | Medium |
| Carton surface | Inspect the sealing area for dust, loose fibers, wax, oil, or excessive recycled-fiber debris. | The carton flap should be dry, clean, and fully closed before tape contact. | Fine dust is visible along the center seam of the carton. | Poor contact can cause the tape to lift, buckle, or tear during wipe-down. | Improve carton housekeeping, remove loose dust, and verify that cartons are not exposed to oil or condensation. | Medium |
| Application pressure | Verify the position and pressure of the wipe-down rollers or brushes. | The applicator should press the tape evenly without forcing the tape into a sharp carton edge. | Right-side roller is set noticeably lower than the left-side roller. | Uneven pressure can pull the tape diagonally and initiate tearing. | Level the applicator, check roller spring settings, and confirm that pressure is distributed across the tape width. | High |
| Carton dimensions | Measure carton height, width, and flap alignment against the machine setup. | Cartons should be within the sealer's specified size range and have square, properly aligned flaps. | Carton flap is offset by approximately 5 mm from the center seam. | The tape may be forced to change direction and tear at the flap transition. | Correct carton forming, adjust side guides, and verify that the carton enters the sealer squarely. | Medium |
| Tape width and core fit | Confirm that the tape width and core diameter match the machine components. | Tape should fit the holders and guides without excessive side play or forced contact. | Core has excessive clearance on the unwind shaft. | The roll can wobble, causing lateral movement and edge damage. | Use the correct shaft adapters or core size, and inspect the holder for wear. | Medium |
| Cut-off mechanism | Inspect the cutting blade or tear-off edge for burrs, adhesive buildup, and incorrect timing. | The blade should cut or separate the tape cleanly without contacting the carton or dragging the tape. | Blade edge has adhesive buildup and leaves a jagged tape end. | A damaged cut can create a notch that propagates into a longer tear. | Clean or replace the blade, verify blade position, and check the cut-off timing at operating speed. | Medium |
| Operating speed | Compare tape behavior at normal production speed and at a slower test speed. | Tape should remain stable throughout the permitted speed range. | Tape tears only above 22 cartons per minute. | Higher acceleration can expose marginal tension, alignment, or adhesive problems. | Reduce speed temporarily for diagnosis, then correct the mechanical cause before returning to production speed. | Medium |
| Environmental conditions | Record temperature and relative humidity near the sealing station. | Keep conditions stable and follow the tape supplier's recommended application range. | Temperature is 8 °C and cartons feel cold to the touch. | Cold adhesive may have reduced initial tack and may become more prone to lifting or splitting. | Condition tape and cartons before use, avoid condensation, and verify adhesion after the materials reach the work-area temperature. | High |
Tape tearing often begins with uneven tension. Check the tape roll before changing machine settings. It should unwind smoothly, without jerking or folding. If the roll feels tight, loosen the tension control slightly. Excessive pressure can stretch the tape before it reaches the carton. That hidden strain causes splitting at the cutting point.
Inspect the tape path from the roll to the application rollers. The tape should travel straight and remain centered. A small sideways shift can make one edge scrape the guide. Clean adhesive residue and dust from the rollers with a suitable lint-free cloth. Check the cutting blade as well. A dull or bent blade may pull the tape instead of cutting it cleanly. Replace damaged parts according to the equipment instructions.
Adjust the top and bottom pressure gradually. Too much pressure can crush the carton and force the tape to buckle. Too little pressure leaves air pockets beneath the tape. Run several empty cartons through the sealer, then test filled cartons with similar weight. Watch the tape at the front and rear edges. Small changes work best.
Do not change every setting at once. I have seen operators overcorrect tension, then blame the tape. That mistake wastes time. Record each adjustment, even the unsuccessful ones. A stable machine should apply a straight strip, with firm contact and no torn edges. Temperature and tape age can still affect performance, so inspect both before repeating the test.
Preventive Maintenance for Reliable Carton Sealing
Torn tape often indicates a maintenance problem, not merely poor tape quality. A dull cutting blade can stretch and split the tape during each cycle. Worn rollers may also create uneven tension across the carton seam. Inspect these parts at the start of every shift. Look for adhesive buildup, loose fasteners, bent guides, and damaged roller surfaces. Small defects become expensive interruptions.
Preventive maintenance should follow a simple, recorded schedule. Clean the tape path with a suitable dry cloth, then check alignment against a straight carton. Confirm that the tape roll unwinds smoothly without side-to-side movement. Measure compression and sealing pressure when the machine allows adjustment. Excessive pressure can wrinkle cartons and strain the tape. Insufficient pressure leaves weak seals. I have seen teams adjust tension repeatedly without checking alignment first. That mistake wastes tape and hides the real cause.
Tips: Keep spare blades, rollers, and guides nearby. Replace damaged parts early. Test three cartons after every adjustment. Record the carton size, tape type, and machine setting. A short log helps identify repeating failures, although operators may forget to update it. Check blade sharpness weekly, especially in dusty areas. Listen for scraping sounds. They often appear before visible damage. Stop and inspect when tape begins tearing; continuing the run can spread adhesive across rollers and guides.
Uneven tension, adhesive buildup, misaligned guides, or a dull blade can cause jagged tears. The obvious cause may be wrong.
Disconnect power before inspection. Remove loose tape from rollers, guides, and the cutter area.
Follow the tape from the roll to the application rollers. It should stay centered and travel straight.
The roll should unwind smoothly without jerking. A tight roll may stretch the tape before cutting.
Look for chips, rounded edges, bends, or sticky residue. The blade should contact the tape cleanly.
Change tension gradually, then adjust top and bottom pressure separately. Small changes reduce accidental overcorrection.
Excessive pressure may crush the carton and buckle the tape. Low pressure can leave air pockets underneath.
Run several empty cartons, then test filled cartons with similar weight. Watch the tape’s front and rear edges.
Use a lint-free cloth and an approved maintenance solution. Avoid scraping adhesive with sharp metal tools.
Check tape age, temperature, worn bearings, and tape tension. Record every change, including unsuccessful adjustments. The inspection may remain incomplete.
When asking, “why is the carton sealer tearing the tape,” the problem usually comes from issues in the tape path, cutting components, tension, alignment, or adhesive quality. A bent guide, dull or damaged blade, loose mounting point, excessive tension, or poorly positioned tape roll can cause the tape to stretch, wrinkle, or break during application. Inconsistent adhesive performance may also prevent the tape from bonding smoothly to the carton surface.
Begin by inspecting the tape path and cutting area for debris, wear, or misalignment. Check that the tape roll rotates freely and that tension is firm but not excessive. Confirm that the tape runs centrally through the guides and that the cutting mechanism moves cleanly. Adjust the guides, tension settings, and cutting components gradually, then test the sealer with several cartons. Regular cleaning, timely replacement of worn parts, and routine checks of tape storage conditions can help maintain smooth, reliable carton sealing and prevent repeated tape tearing.

Collins Machine